In this guide, we’ll walk you through the steps to add Brotli compression to your Laravel applications deployed on both Laravel Vapor and Laravel Sail. Brotli, developed by Google, is a modern compression algorithm that offers significantly better compression rates compared to Gzip, resulting in faster web page loads and reduced bandwidth usage. Let’s dive into the setup process for both environments.
Why Use Brotli Compression?
Brotli compression provides the following benefits:
- Higher Compression Rates: Brotli can compress files better than Gzip, reducing the size of your assets.
- Faster Loading Times: Smaller file sizes mean faster loading times, enhancing user experience.
- Reduced Bandwidth Usage: Efficient compression helps in reducing bandwidth usage, which can save costs and improve performance, especially on mobile networks.
Adding Brotli Compression to Laravel Vapor
Laravel Vapor is a serverless deployment platform for Laravel, powered by AWS. Adding Brotli compression involves configuring your deployment settings and modifying your Dockerfile.
Before proceeding, make sure you familiarize yourself with docker runtimes on Vapor based on the official documentation – https://docs.vapor.build/projects/environments.html#docker-runtimes.
1. Installing brotli in custom Dockerfile
If you did everything correctly, you should have default production.Dockerfile in the root of your app which looks something like this:
FROM laravelphp/vapor:php82

COPY . /var/task
We are going to modify the content as follows:
FROM laravelphp/vapor:php83

# Adding brotli
RUN apk add --no-cache brotli git
RUN git clone --recursive --depth=1 https://github.com/kjdev/php-ext-brotli.git
RUN cd php-ext-brotli && phpize && ./configure && make && make install
COPY ./php.ini /usr/local/etc/php/conf.d/overrides.ini

COPY . /var/task
2. Customizing Core php.ini Directives
Next up, we need to load brotli extension in custom php.ini directive. To do that, create php.ini file in to root of your application and add the following code:
extension=brotli.soThat’s it. Only one line that loads brotli extension which we installed in step one.
3. Modifying vapor.yml and deploying
If you didn’t do it yet, now it is time to update your vapor.yml to use the prepared production.Dockerfile. Only important change is runtime which should be set to docker.
id: 1
name: vapor-laravel-app
environments:
    production:
        runtime: docker
        build:
            - 'composer install --no-dev'
After everything is configured, proceed by deploying your app.
vapor deploy productionTake note that we are not using the brotli extension yet, but at this point you should be able to use it in your Vapor app. Adding compression middleware will be discussed in the end.
Adding Brotli Compression to Laravel Sail
Laravel Sail is a lightweight command-line interface for interacting with Laravel’s default Docker development environment. Adding Brotli compression to Laravel Sail involves configuring the Docker environment and the Nginx setup.
Before proceeding, we will need to publish sail’s Dockerfiles. You can read more about it in the official documentation here – https://laravel.com/docs/11.x/sail#sail-customization.
1. Publishing and updating Dockerfiles
First, we need to publish sail’s Dockerfiles by running
sail artisan sail:publishThis will create a new folder docker with different php versions. We are going to use php version 8.3, but process should be the same for all other versions as well.
We proceed by editing /docker/8.3/Dockerfile file as follows
FROM ubuntu:22.04

LABEL maintainer="Taylor Otwell"

ARG WWWGROUP
ARG NODE_VERSION=20
ARG MYSQL_CLIENT="mysql-client"
ARG POSTGRES_VERSION=15

WORKDIR /var/www/html

ENV DEBIAN_FRONTEND noninteractive
ENV TZ=UTC
ENV SUPERVISOR_PHP_COMMAND="/usr/bin/php -d variables_order=EGPCS /var/www/html/artisan serve --host=0.0.0.0 --port=80"
ENV SUPERVISOR_PHP_USER="sail"

RUN ln -snf /usr/share/zoneinfo/$TZ /etc/localtime && echo $TZ > /etc/timezone

# Only difference is adding brotli to apt-get line
RUN apt-get update \
    && mkdir -p /etc/apt/keyrings \
    && apt-get install -y gnupg gosu curl ca-certificates zip unzip git supervisor sqlite3 libcap2-bin libpng-dev python2 dnsutils librsvg2-bin fswatch ffmpeg nano brotli  \
    && curl -sS 'https://keyserver.ubuntu.com/pks/lookup?op=get&search=0x14aa40ec0831756756d7f66c4f4ea0aae5267a6c' | gpg --dearmor | tee /etc/apt/keyrings/ppa_ondrej_php.gpg > /dev/null \
    && echo "deb [signed-by=/etc/apt/keyrings/ppa_ondrej_php.gpg] https://ppa.launchpadcontent.net/ondrej/php/ubuntu jammy main" > /etc/apt/sources.list.d/ppa_ondrej_php.list \
    && apt-get update \
    && apt-get install -y php8.3-cli php8.3-dev \
       php8.3-pgsql php8.3-sqlite3 php8.3-gd \
       php8.3-curl \
       php8.3-imap php8.3-mysql php8.3-mbstring \
       php8.3-xml php8.3-zip php8.3-bcmath php8.3-soap \
       php8.3-intl php8.3-readline \
       php8.3-ldap \
       php8.3-msgpack php8.3-igbinary php8.3-redis php8.3-swoole \
       php8.3-memcached php8.3-pcov php8.3-imagick php8.3-xdebug \
    && curl -sLS https://getcomposer.org/installer | php -- --install-dir=/usr/bin/ --filename=composer \
    && curl -fsSL https://deb.nodesource.com/gpgkey/nodesource-repo.gpg.key | gpg --dearmor -o /etc/apt/keyrings/nodesource.gpg \
    && echo "deb [signed-by=/etc/apt/keyrings/nodesource.gpg] https://deb.nodesource.com/node_$NODE_VERSION.x nodistro main" > /etc/apt/sources.list.d/nodesource.list \
    && apt-get update \
    && apt-get install -y nodejs \
    && npm install -g npm \
    && npm install -g pnpm \
    && npm install -g bun \
    && curl -sS https://dl.yarnpkg.com/debian/pubkey.gpg | gpg --dearmor | tee /etc/apt/keyrings/yarn.gpg >/dev/null \
    && echo "deb [signed-by=/etc/apt/keyrings/yarn.gpg] https://dl.yarnpkg.com/debian/ stable main" > /etc/apt/sources.list.d/yarn.list \
    && curl -sS https://www.postgresql.org/media/keys/ACCC4CF8.asc | gpg --dearmor | tee /etc/apt/keyrings/pgdg.gpg >/dev/null \
    && echo "deb [signed-by=/etc/apt/keyrings/pgdg.gpg] http://apt.postgresql.org/pub/repos/apt jammy-pgdg main" > /etc/apt/sources.list.d/pgdg.list \
    && apt-get update \
    && apt-get install -y yarn \
    && apt-get install -y $MYSQL_CLIENT \
    && apt-get install -y postgresql-client-$POSTGRES_VERSION \
    && apt-get -y autoremove \
    && apt-get clean \
    && rm -rf /var/lib/apt/lists/* /tmp/* /var/tmp/*

# Install Brotli PHP extension, don't forget to load the extension in php.ini
RUN cd /tmp && git clone --recursive --depth=1 https://github.com/kjdev/php-ext-brotli.git
RUN cd /tmp/php-ext-brotli && phpize && ./configure && make && make install

RUN setcap "cap_net_bind_service=+ep" /usr/bin/php8.3

RUN groupadd --force -g $WWWGROUP sail
RUN useradd -ms /bin/bash --no-user-group -g $WWWGROUP -u 1337 sail

COPY start-container /usr/local/bin/start-container
COPY supervisord.conf /etc/supervisor/conf.d/supervisord.conf
COPY php.ini /etc/php/8.3/cli/conf.d/99-sail.ini
RUN chmod +x /usr/local/bin/start-container

EXPOSE 8000

ENTRYPOINT ["start-container"]
2. Updating php.ini
In the same folder /docker/8.3/ you will find php.ini file. Only thing we are changing is adding brotli.so extension at the end of the existing file as follows
[PHP]
post_max_size = 100M
upload_max_filesize = 100M
variables_order = EGPCS
pcov.directory = .

extension=brotli.so
3. Updating docker-compose.yml
This step should be done automatically when you publish Dockerfiles, but let’s review the changes. Here’s the full configuration and changes are commented in the same line
services:
    office.local:
        build:
            context: ./docker/8.3 # Changed from ./vendor/laravel/sail/runtimes/8.3
            dockerfile: Dockerfile
            args:
                WWWGROUP: '${WWWGROUP}'
        image: sail-8.3/app
        extra_hosts:
            - 'host.docker.internal:host-gateway'
        ports:
            - '${APP_PORT:-80}:80'
            - '${VITE_PORT:-5173}:${VITE_PORT:-5173}'
        environment:
            WWWUSER: '${WWWUSER}'
            LARAVEL_SAIL: 1
            XDEBUG_MODE: '${SAIL_XDEBUG_MODE:-off}'
            XDEBUG_CONFIG: '${SAIL_XDEBUG_CONFIG:-client_host=host.docker.internal}'
            IGNITION_LOCAL_SITES_PATH: '${PWD}'
        volumes:
            - '.:/var/www/html'
        networks:
            - sail
        depends_on:
            - mysql
            - redis
    mysql:
        image: 'mysql/mysql-server:8.0'
        ports:
            - '${FORWARD_DB_PORT:-3306}:3306'
        environment:
            MYSQL_ROOT_PASSWORD: '${DB_PASSWORD}'
            MYSQL_ROOT_HOST: '%'
            MYSQL_DATABASE: '${DB_DATABASE}'
            MYSQL_USER: '${DB_USERNAME}'
            MYSQL_PASSWORD: '${DB_PASSWORD}'
            MYSQL_ALLOW_EMPTY_PASSWORD: 1
        volumes:
            - 'sail-mysql:/var/lib/mysql'
            - './docker/mysql/create-testing-database.sh:/docker-entrypoint-initdb.d/10-create-testing-database.sh' # Changed from './vendor/laravel/sail/database/mysql/create-testing-database.sh:/docker-entrypoint-initdb.d/10-create-testing-database.sh'
        networks:
            - sail
        healthcheck:
            test:
                - CMD
                - mysqladmin
                - ping
                - '-p${DB_PASSWORD}'
            retries: 3
            timeout: 5s
    redis:
        image: 'redis:alpine'
        ports:
            - '${FORWARD_REDIS_PORT:-6379}:6379'
        volumes:
            - 'sail-redis:/data'
        networks:
            - sail
        healthcheck:
            test:
                - CMD
                - redis-cli
                - ping
            retries: 3
            timeout: 5s
networks:
    sail:
        driver: bridge
volumes:
    sail-mysql:
        driver: local
    sail-redis:
        driver: local
4. Rebuilding and restarting sail
Finally, we must rebuild the project with
sail build --no-cacheAnd start it with
sail upTake note that we are not using the brotli extension yet, but at this point you should be able to use it in your Sail app. Adding compression middleware will be discussed in the next chapter.
Adding compression middleware
Finally, to leverage added brotli compression extension, we must actually compress the response. We can do that by creating new middleware as follows
php artisan make:middleware BrotliEncodeResponseNext, we will update the code as follows
<?php

namespace App\Http\Middleware;

use Closure;
use Illuminate\Http\Request;
use Symfony\Component\HttpFoundation\BinaryFileResponse;
use Symfony\Component\HttpFoundation\Response;
use Symfony\Component\HttpFoundation\StreamedResponse;

class BrotliEncodeResponse
{
    /**
     * Handle an incoming request.
     *
     * @param  \Closure(\Illuminate\Http\Request): (\Symfony\Component\HttpFoundation\Response)  $next
     */
    public function handle(Request $request, Closure $next): Response
    {
        $response = $next($request);

        // Optionally, disable on local
        // if (app()->isLocal()) {
        //     return $response;
        // }

        // Do not compress non-html responses
        if ($response instanceof BinaryFileResponse || $response instanceof StreamedResponse) {
            return $response;
        }

        // Compress and add headers
        if (
            in_array('br', $request->getEncodings())
            && function_exists('brotli_compress')
        ) {
            $response->setContent(brotli_compress($response->getContent(), 9));
            $response->headers->add([
                'Content-Encoding' => 'br',
                'X-Vapor-Base64-Encode' => 'True',
            ]);
        }

        return $response;
    }
}
Final thing to do is to register newly created middleware. This entirely depends on your preferences and how to do it is nicely described in the official documentation – https://laravel.com/docs/11.x/middleware#registering-middleware.
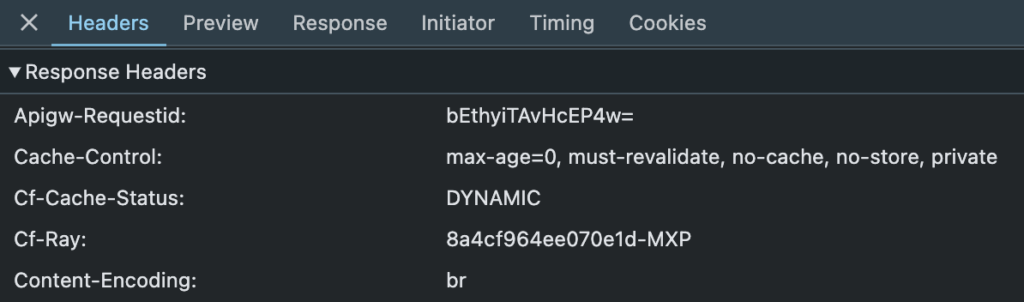
That’s it, once you refresh the page you should see header in the response and the response size should be much smaller.
Small note on using brotli compression with Livewire and Laravel Filament
If you followed the steps for your Laravel Filament driven app, you might be surprised to see blank screen. This is actually a Livewire issue with automatic assets loading and can be simply solved by manually registering Livewire assets in Filament. To do that, first update /config/livewire.php file with following change
'inject_assets' => false, // Changed from trueAnd finally, in your AdminPanelProvider.php add following lines to register() method
    public function register(): void
    {
        parent::register();
        FilamentView::registerRenderHook('panels::body.end', fn (): string => Blade::render('@livewireScripts'));
        FilamentView::registerRenderHook('panels::head.end', fn (): string => Blade::render('@livewireStyles'));
    }
Now everything should work as expected.
Conclusion
Adding Brotli compression to your Laravel applications on Vapor and Sail can significantly improve performance by reducing file sizes and load times. By following the steps outlined in this guide, you can ensure your applications are optimized for speed and efficiency. Happy coding!
If you want to level up your apps and your codebase, check out other posts on our blog igloo.hr.
For further assistance with Adding Brotli Compression to Laravel Vapor and Laravel Sail, Laravel development or integrating AWS services, feel free to contact us at [email protected].
Good luck with your deployment!